Care of your Bare Rooted Plants
Bare rooted plants can be kept in their packaging for a few days. Keep them cool and moist by watering the root ball in the packaging, swishing the water around, and then tipping the water back out.
If there is to be a delay of more than a few days before planting, heel the plants in: Soak the roots for 15 minutes in water with a dash of liquid fertiliser. Place bundles into trenches of moist earth and loosely cover the roots with soil.
Planting Preparation
Prep Holes: We recommend that you re-prepare planting holes in March/ April ahead of receiving your trees. Dig in mineral amendments and compost into the topsoil in a 0.6-1.0m diameter and 20cm deep. Deeper is not better!
Animals: Fence from browsing animals otherwise you are buying very expensive animal feed! If Rabbits or Hares are present your trees will need trunk sleeves to 70cm. Fencing animals out? Perhaps you can design this infrastructure to also rotate beneficial animals within the orchard?
Shelter: The orchard site must be sheltered. On a windy site this shelter should be established at least a year ahead. If planting shelter the same year as the fruit trees use very fast species and consider planting not only the perimeter but also within the orchard with shelter trees.
Soil: A depth of around 20cm of topsoil is enough for most fruit trees. If drainage is an issue plant on a shallow mound or a swale berm. Balance soil minerals over the whole orchard area with mineral amendments.
 Planting Guide
Plant bare root trees and shrubs from Late June till late August.
- Soak the roots for 15 minutes before planting in a very dilute liquid fertiliser.
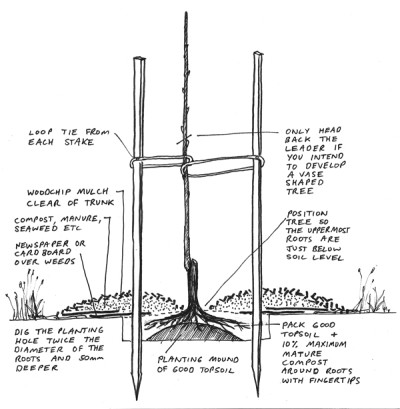
- Check the root ball dimensions and dig a hole twice their diameter and only 50mm deeper than the root ball depth (measured from uppermost roots to lowest).
- Drive in two 1.5m x 50x50mm Macrocapa stakes 50cm apart in the hole.
- Make a pyramid mound of good topsoil in the middle of the planting hole and spread the roots of the fruit tree over this. Adjust the height of the mound so the tree sits with its uppermost roots just below soil level. Check this by putting a straight stake across the planting hole.
- Mix good topsoil from the hole with maximum 10% mature compost. More is not better!
- Using your fingertips pack this mix around the tree roots in layers, spreading the roots horizontally as you go. Check uppermost roots end up just below soil level. Water well.
- Make a generous ‘doughnut’ of compost/manure/seaweed/organic matter around the tree so that it is fed slowly from above. If there are perennial weeds around the tree, such as couch grass, apply a thick layer of newspaper or a double layer of cardboard, (well overlapped), under this doughnut. Cover with a mulch of native and /or deciduous tree chips, this will feed beneficial soil fungi. Keep mulch etc away from the tree trunk.
- Tie the tree about half way up with a loop attached to each stake. Allow the tree some movement.
- Water well.
- We recommend leaving most fruit trees un-pruned at planting. Only head back (cut back) the leader if you intend to create a vase shaped tree (a shape often used for stone fruit) or have a very windy site and want to train your central leader tree from a lower starting height.
Aftercare
Water weekly as needed for the first couple of months and then as needed in dry periods.
Surface feed and mulch each winter (under mulch) and watering in accordance with your soils needs and the plants growth. Establish appropriate groundcover plants to keep weeds, especially grass, suppressed.
Carefully chosen groundcover and companion plants such as Russian and Dwarf Comfrey, Sweet Cicely and Feverfew can help improve soil structure and fertility. They can also aid with pest and disease prevention.
Pinch off all flowers/ fruit in November until tree is growing vigorously and has strong branches, usually in their third summer you can leave a small crop on. Remove all growth from below the graft union.
Fruit Tree Training & Pruning
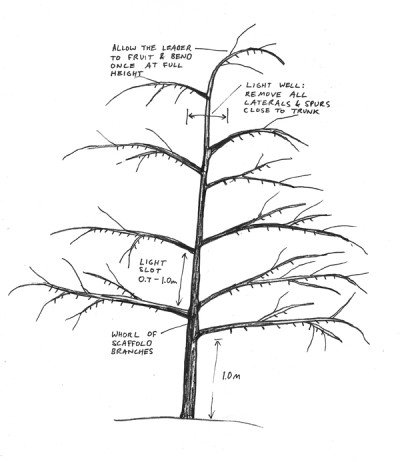
Most fruit trees will naturally adopt a central leader shape, with a strong central trunk and near horizontal branches radiating off this. Stone fruit are usually trained as a vase shape (see below).
 Central Leader
Year One: Leave the trunk un-pruned. Prune off any branches below 1m and any competing leaders. In November remove any developing fruit and train down all branches so that their junction with the trunk is near to ninety degrees and the branch is near to horizontal. Tree training rubber bands, twine or notched spacers can be used for this job.
Year Two: August, prune off any branches below 1m and any competing leaders. Prune out completely any dead, diseased or damaged (crossing) branches. Prune out any fruit spurs on or close to the trunk and any on the lower side of branches. Training aids from November may be removed now if the branches stay in the horizontal position. In November thin out all fruit except one or two near the trunk.
Year Three: Repeat winter pruning, take out whole branches as necessary to create well spaced branches up the trunk. You may leave more fruit on this year if the tree is sturdy. From now on thin all fruit to one or two fruit per spur.
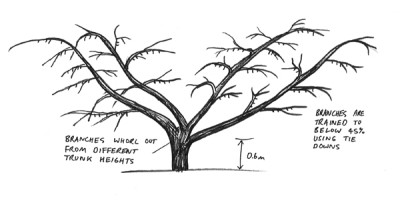 Vase Shape Trees
Year One: Head back the main trunk to around 1m, either to some good side shoots or good buds. Prune off any branches below 0.8m and any competing leaders (side shoots growing too vertically). In November remove any developing fruit and train down all branches so that their junction with the trunk is near to ninety degrees and the branch is near to 45%. Tree training rubber bands, twine or notched spacers can be used for this job.
Year Two: August, select four strong branches to be your main vase structure. Prune off any branches below 0.8m and any vertical shoots surplus to your four main branches. Prune out completely any dead, diseased or damaged (crossing) branches. Prune out any fruit spurs on or close to the trunk and any on the lower side of branches. Training aids from November may be removed now if the branches stay in the 45% position. In November thin out all fruit except one or two near the trunk.
Year Three: Repeat winter pruning, take out whole branches as necessary to create well spaced vase of four branches from the main trunk. You may leave more fruit on this year if the tree is sturdy. From now on thin all fruit to one or two fruit per spur.